Research Guides
A workshop on the core mechanics
October 2, 2014
History (for context)
Long ago, we had "Subject guides"
Thesis
Subject guides
- Manually maintained (lots of copy-pasta links)
- Constrained by Web guidelines and CMS technology
Anti-thesis
From subject guides to research guides
- Centralize electronic resource info: edit once to fix everywhere
- Offer guidance beyond lists of links
- Support content editing directly by liaison librarians
Synthesis
From research guides to almost a full site
- Never meant to be a full web CMS
- but "LU Web as brochure" forced our hand
- Never meant to be split across two sites
- but we have laurentian.ca/library vs. biblio.laurentian.ca
Goals for this session
- Learn to do the best you can with what we have
- Get hands-on with the core functionality
- WIBNI thoughts about the research guides are welcome
- ... but need to be balanced against all of our library's other goals
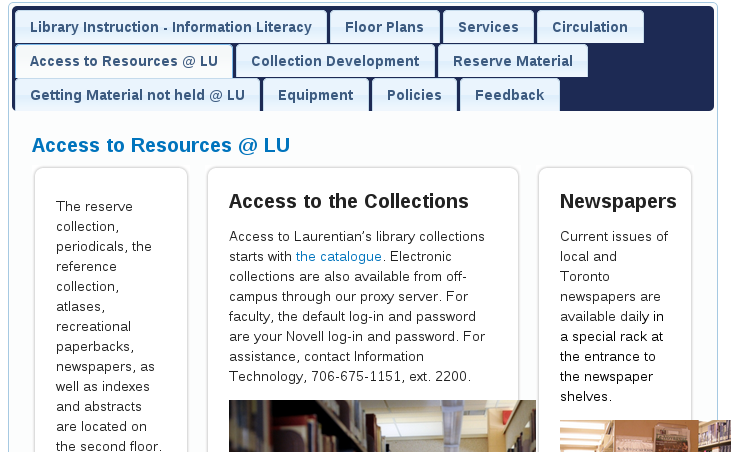
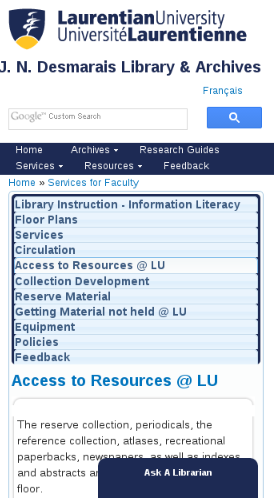
Getting started: the test server
- We have two research guide servers:
- Production: What our users see, at http://biblio.laurentian.ca/research
- Test/training: What we can use to practice with, at http://biblio-dev.laurentian.ca/research
- Open up the Test server in a browser tab now
- Notice - TEST SERVER in the banner!
Learn on Test
But work on Production
- Copying from test to production is not recommended
- Links get confused and lead users to the test system
- Images get uploaded to test; links lead to test; then test gets refreshed and the images are broken
Exercise 1: Log on
- Production: http://biblio.laurentian.ca/research/user
- Test/training: http://biblio-dev.laurentian.ca/research/user
Use your Laurentian ID to log in.
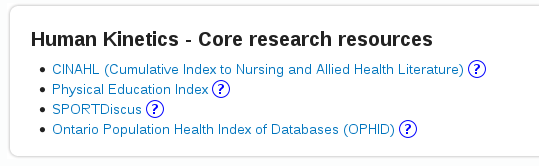
Databases
- "Database" is a pretty broad definition at this point:
- Ebook collections
- TERMIUM Plus
- ...
Exercise 2: Create a new database
See the Exercise sheet
Exercise 3: Find existing content
- Click My Account. Your user account page displays.
- Click Search content in research guides. The content search page appears.
- Use the
Type,Language,Publishedfilters to narrow down your search.- Note: Searching by typing in the name sometimes works.
Exercise 4: Trial databases
Turn your database entry into a trial database that times out next week.
- Find your database.
- Edit the database by entering a start and end date for the trial.
- Save your changes and ensure your database shows up on the Resources -> Electronic resources -> Free trials page.
Exercise 5: Multidisciplinary databases
Add your database to the multidisciplinary list.
- Find your database.
- Edit the database by checking the Multidisciplinary checkbox.
- Save your changes and ensure your database shows up on the Resources -> Electronic resources -> Multidisciplinary databases page.
Custom database lists
Custom database lists
- Contain any entries you want from the database A-Z list
- Can be ordered (but it's painful)
- Are not translated, because some resources may be suitable for one language and not the other
Exercise 6: Create a custom database list
- Click Add Content -> Database list.
- Enter the title of the database list.
- Use the slushbox widget to move entries to the right.
- Save your work.
Caution: Preview considered harmful
- Don't use Preview to look at your database list.
- If you have not saved your work, you will lose all of the entries in the list.
- If you then click Save, you will turn your list into an empty list.
Yes, it's a bug.
About Revisions
- Consider creating a New revision when saving edits.
- For databases and database lists, you can revert to previous versions if something bad happens.
- Sadly, doesn't work for all research guide content. WIBNI...?
Translations
What's wrong here?
Exercise 7: Add a new translation
- Find your database. If you set the language of your database, there is a Translate tab.
- Click Translate -> Add translation. A copy of the database edit page opens.
- The language will be set correctly, but you may have to edit the title, description, URL, etc.
- Click Save.
- Click Translate and notice that there is now a translation set.
Ahh, much better.
Research Guides
Finally...
Design philosophy
- One web page per guide
- Unlimited tabs per guide
- Up to three columns per tab
- One or more panels of HTML content per column
- Unlimited panels per column
A little less than chaos
Recommendations: structure
- First tab should have the critical content:
- Mobile experience
- Scannable content
- Move towards one or two columns
- Mobile experience
- Scannable content
- Too many tabs? Your guide is pregnant! Split it up.
- Mobile experience
- Scannable content
Mobile experience
Exercise 8: Create a new research guide
- Click Add content -> Subject guide.
- Enter the title of the guide.
- Select the faculty, school, or department to which it belongs (or
Servicefor a library service). - Select the language of the guide.
- In Subject Guide Pages, add the list of tabs your guide needs.
- By default, the guide is not published. Click Save.
Exercise 9: Set the layout for a tab of your research guide
- Find your research guide. (Hint: My account)
- The name of the active tab appears as a main heading on the page. Click the heading. The panel editing page opens.
- Select a layout for your tab by clicking Panel layout.
- The default is a single column layout.
- Click the radio button above the layout you want, even if there is only one choice.
You have to set the layout for each tab in your guide. I know, right?
Exercise 10: Set the display style of a tab
- From the panel editing page, click Panel content to add content.
- Click Display settings in the top left corner and select
Rounded corners. - Click Next.
- Select
Each panefrom the drop-down list to apply the style to all panels on the tab.
Exercise 11: Add panels to a column
- From the panel editing page, click Panel content to add content.
- At the top left corner of each column header is a gear icon. Click gear icon -> Add content to add a panel. The Add content window opens.
- Click New custom content to create a new panel. The Configure new custom content window opens.
- Enter an administrative title: this distinguishes the panel from any other panel in search. Use Research guide name - Tab name - Panel name.
- Enter a title: this is displayed to the user as the heading for the panel.
- Add your HTML content using the WYSIWYG editor.
- Clear the Use context keywords checkbox.
- Click Finish. The Configure new custom content window closes. You are not yet finished.
- Click Save to actually save your work.